It’s been far too long since my last post and it’s good to be back. My silence doesn’t mean that there’s nothing new to report, however. Since parting with my Reference 3A De Capo’s several months ago, there have been a number of major changes to my rig that I’m eager to tell you about…
Drum Roll…
I purchased a pair of Omega Speakers. I really wanted to try the single-driver thing and see what all the fuss was about, especially since so many owners of SET amps seem to find single-driver designs an excellent match for their electronics. I ended up with a pair of Omega Super Alnico monitors, which feature a 6-inch, hemp cone driver which is proprietary to Omega. I’m still breaking them in and tweaking them, so there’s no review just yet.
But They Need Stands!
The Super Alnico’s need some good stands and they are somewhat larger than many monitors. Additionally, conventional wisdom on the Omega Forum is that you want them to be about 20 inches off the floor, which isn’t a standard height for monitor stands. Thus, if you want to get the absolute best out of these babies, you’re looking at ordering a custom stand. After doing some research (and yes, there are cheaper alternatives out there) I took the advice of a bunch of folks on the Omega Forum at Audiocircle and went with a pair of custom stands from Skylan. Why spend all that money on speakers and then not hear them at their best by putting them on substandard stands? So, Skylan four-post, custom stands it was.
In this post I’ll share some detailed unboxing and assembly photos, along with overall impressions.
Skylan is located in Calgary, Alberta, Canada, and is owned and operated by Noel Nolan. They’ve been in business since 1985. Skylan makes component racks, speaker stands and amplifier bases. Everything can be custom made to your exact measurements. Noel is a delightful guy to talk to and is keen to answer all of his customers’ questions before and after the sale.
Unboxing Photos
Noel gave me a 3 week ETA on delivery of my stands. He beat that delivery date by a few days, which put a smile on my face.
But what really got me grinning was the way in which the stands were packed: there seems to be at least as much forethought and engineering built into the packaging of these stands as there is in the stands themselves.
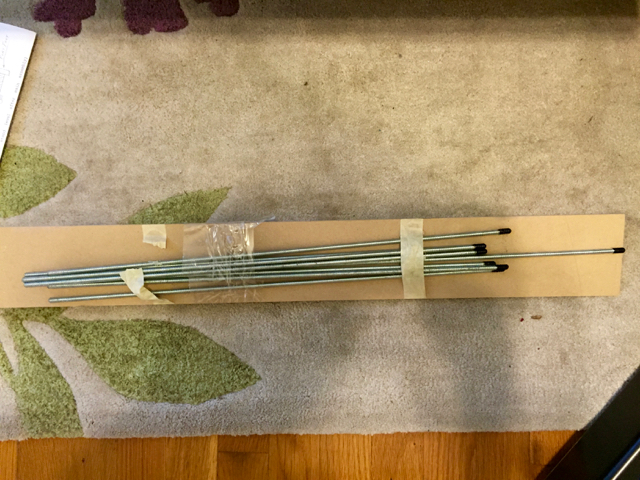
Here’s the shipping carton.The top layer in the newly opened box shows underside of the the top plates of the stands; note the stickers clearly showing the front of the stands, as well as the assembly instructions in the middle. The pink foam packing strips in the middle are glued onto the cardboard below.Again, careful packaging engineering. This foam piece is glued onto each of the inner carton flaps ensures that those top plates aren’t going to slide around at all in the carton!Next layer brings us the bottom plates of the stands.Here’s the first of two layers of speaker posts. Again, note the elegance of the packing engineering. The vertical foam strips are glued on the cardboard below, to keep them snug in the carton, and there are folded sheets of foam inserted between each post to prevent scratching in transit. See those cardboard tubes on either side?……they’re also glued onto the cardboard, below, to make sure there’s no pressure on the posts in shipping. Awesome!Below a second layer of speaker posts, we have a strip of folded cardboard with several items taped to it. On this side we see the bag of hardware, including two kinds of floor spikes (see next photo) and a FREE SKYLAN FLASHLIGHT!!!!Hardware bag, including speaker spikes, washers, locknuts and wrench.And, on the other side, we have 8 threaded tensioning rods, one of which will run through each speaker post.
Assembling the Skylans
Although the assembly instructions consist of two sides of a single sheet of paper, they are clear and thorough, making the assembly process fairly easy.
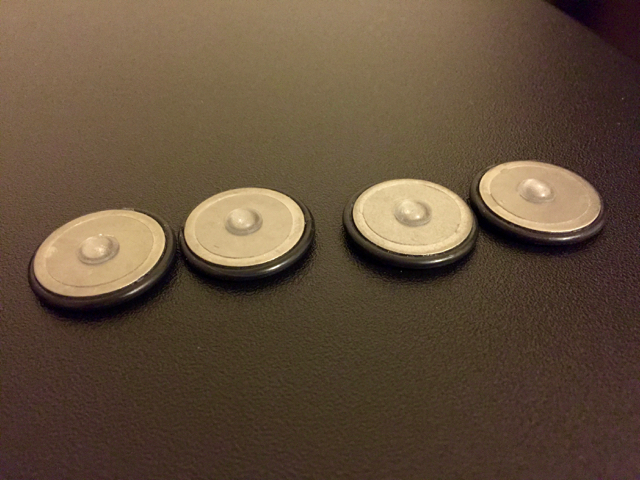
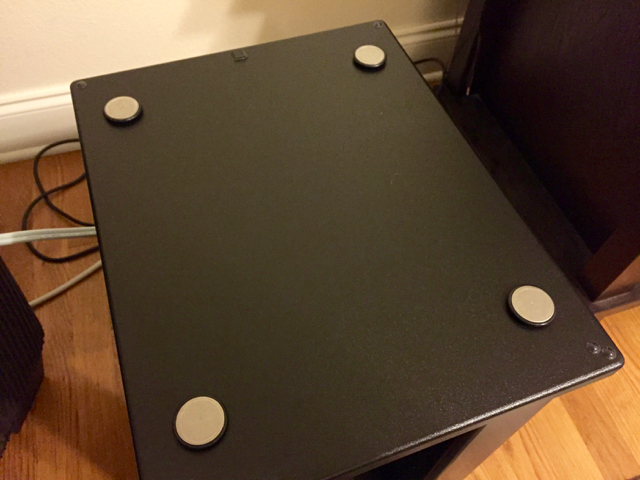
Here’s one of the speaker top places, upside down. You start by screwing the tension rods into the top plates, like so. (Noel has thoughtfully colored the end that goes into the top plate in black – very nice!)Next, you place a piece of pre-cut foam material around each tension rod, and slip a speaker post over each piece of foam and onto the precisely cut positioning pad that is glued to the bottom of the top plate. Since the tensioning rods pass through the foam, the foam will serve to absorb and deaden vibrations that pass down from the top plate through the tensioning rods. Clever, no?Here are all four posts in place, with the tension rods poking out the top.Now’s the time to decide about damping the stand. Noel recommends filling the posts with kitty litter or white rice, as above. There’s also a school of thought on the Omega Forums that says that the Omega Alnico monitors sound best with the Skylan posts unfilled or only lightly damped (or “lossy) but I decided to go by the book on this one. Plus, I don’t have a cat but figured I could always use the extra rice for dinner!Here’s the bottom plate in position, with the last bit of tensioning rods poking through on top.As above, from another angle. Note the holes into which we’ll be screwing the spikes or feet in just a bit.These little guys, which Noel was nice enough to enclose, are his “Q-Bricks” vibration control devices. They are a sandwich of two metallic circles, with some sort of rubber in the middle, and a little rubbery dot on the bottom. (They’re upside down in this picture.) Each is roughly the size of a US quarter coin.Here are the Q-Bricks in place. The raised, rubbery dot on each one rests in one of the four holes of the top of each top plate, carrying vibration from the speaker cabinet down into the speaker posts via the tensioning rods. Note that you can experiment with and without the Q-Bricks in place. If you don’t use them, the speakers will rest on the small, rubbery dots that come installed on the four corners (and rear edge) of each top plate.Because I have the stands on hardwood floors, I am using these devices rather than the pointed spikes. I can’t say enough about how well designed these feet are! The hard plastic feels like some sort of Teflon-like material. It couples very solidly to the floor, yet allows easy movement of the speaker stands if needed. Plus, note the knurled edge of the plastic foot, which makes it incredibly easy to level the stand by turning the foot with your fingers, even if the speaker is on top of the stand. Utterly brilliant.Here, in all its glory, is the Omega Alnico monitor (in real, zebra wood veneer) sitting on top of it its Skylan stand. The fit is perfect and the final appearance speaks for itself.
Impressions
You tell from these photographs just how handsome the completed stands turned out to be. You cannot really see the textured, black finish, nor can you lean on the stands and see just how rock solid they are, and how well they couple to the floor. But I will tell you that this is a product that just embodies the concept of “pride of ownership.” Noel Nolan clearly cares a lot about his products, and they fairly exude quality from top to bottom.
As for the sound, there’s no doubt that the Skylan stands have improved the focus, detail and low end of my Omega Super Alnico. I’d had them on cheap and somewhat wobbly, temporary MDF stands before receiving my Skylan’s, and the improvement is not subtle.
Summary
Of course, you know the old cliché, “You get what you pay for.” This is clearly the case with Skylan speaker stands. They aren’t cheap, not by a long shot. Specifically, these stands cost about $500 Canadian, shipping included. (Fortunately, with the US-Canadian exchange rate being favorable to the American dollar at the time, the cost to me was just under $400.) Are there are cheaper stands on the market? Certainly. But I am completely delighted with my Skylan custom stands and I’ve no doubt that they were worth the extra expense.
I’ve tried to convey as best I can what a beautifully designed and executed product this is. If you need speaker stands and can afford to buy (or can save up for) a pair of Skylan’s… do it, you won’t regret the purchase.


Why not fill stands with sand instead ?
I honestly don’t know! But Noel very specifically told me, “kitty litter or rice, but NOT sand,” so I just listened to him. 😉
Where did you get the little plastic feet?
Thanks
The plastic-tipped feet came with the stand. They were great!
Thanks for posting.